|
Getting Started
Step 1 - Profile Manager
After the Setup program is complete, use the shortcut on your desktop to start the Profile Manager.

Here you will see is a listing of all aircraft found in your system, for each of the flight sims installed on your computer. To view the aircraft for a different flight sim, select it using the drop-down listbox at the top. A default profile will be assigned to aircraft that are recognized (FSX default aircraft), others will be left blank. You can assign profiles by double-clicking on the line containing the aircraft. If an aircraft does not have a profile assigned to it, and you select it in FSX for a flight, it will ask you at that time what profile you want to use. There will also be an option to permanently assign that profile to that aircraft.
Step 2 - Options
Next, click on the Options tab.
FS Force is actually comprised of two programs : a .DLL that gets loaded by FSX, and an .EXE that runs outside of FSX in the System Tray. Both programs need to be running for FS Force to work.

Make sure that both Launch Options are set to Auto Launch (or Prompt if you prefer). This means that FSX will automatically start FS Force. Both the Setup program and Profile Manager change launch settings by making entries in EXE.XML and DLL.XML. Both these files can be found under Documents and Settings\<user>\Application Data\Microsoft\FSX.
TRIM GAUGE
You can also specify if you want to use the Trim Indicator, which is a small window that appears briefly each time you make a trim change. Currently, this trim indicator does not work in FSW. The method described below will be used to display the trim valud.

If you select to use the trim indicator, FS Force will install a gauge into each aircraft in your system. The entries will be made in Panel.cfg, which can be found in the Panel folder of each aircraft.
Note that some 3rd party aircraft use a very specialized type of panel and gauge system, and as a result FS Force will be unable to install the trim gauge. An example of this is the PMDG 737 NGX. For these aircraft, trim information will be shown on screen using standard message display functions made available by FSX, as shown in the following screenshot:

For a description of the other options, please visit the Profile Manager page.
Step 3 - Controller Assignments
You need to configure FS Force so it knows what keys and buttons you use for trim commands, and for brakes. Click on the Controller Assignments tab for this.
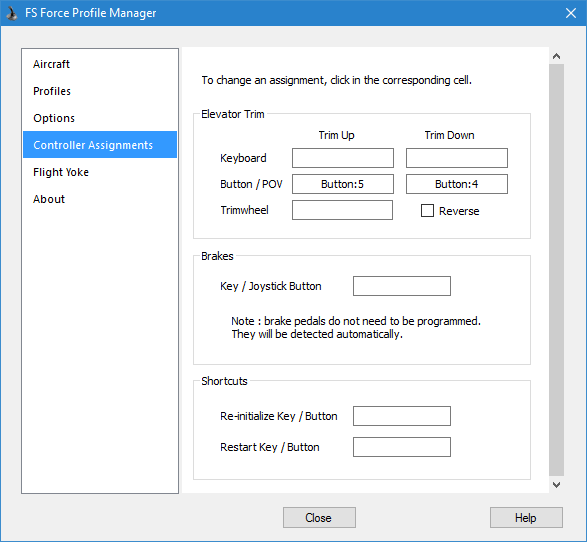
To change the assignment for a particular command, click in the corresponding cell. A pop-up window will present you with some instructions, as shown above. Simply click the controller button or keyboard keys that you want to use for that command. You can also press the Escape key to cancel, or the Delete key to delete an existing assignment.
After programming an assignment in this way, it will show you which button you pressed, but it will not show which controller. This could be confusing if you have more than one game controller. However, by hovering your mouse over an assignment, a tooltip window will appear, showing you which controller the button press came from.
The brake command programming is only applicable if you use the keyboard or a joystick button to activate the brakes. If you have brake pedals, you can leave the field blank, as the pedals will be detected automatically.
Note that for the Re-initialize and Restart shortcuts, the cell can accept either keystrokes or controller buttons.
FSUIPC Customers - please note that trim
commands (buttons or trimwheel), must not be assigned via FSUIPC. Set them up normally in FSX, and
then in addition, assign them in Profile Manager. This is so that FS Force can intercept trim commands and prevent
them from reaching FSX, which is what enables FS Force to provide the functionality that it does. FSUIPC uses a
control input injection technique that prevents FS Force from doing that. (There are also additional FSUIPC
restrictions that apply to Yoke Addon customers.)
Step 4 - Startup
You are now ready to start up FSX. The first time FSX tries to start FS Force you will see two security warnings, one for the .EXE and one for the .DLL.

Click the Run button. After the security warning, you will see another dialog box, asking if you want to trust FSForce.exe in the future. Click Yes.

You will see another identical set of dialog boxes, this time for FSForce.DLL.
Step 5 - FSX Options
Before starting a flight, make sure the default force feedback settings in FSX have been disabled. (This does not apply to early versions of P3D). This is normally done by the Setup program, but you should verify it just the same. You will find it under Settings > Controls > Forces. The reason this is important is because under DirectX, conflicts will occur if both FSX and FS Force try to program force feedback effects at the same time.

You have now completed the necessary steps to configure FS Force and FSX, and are now ready to start a flight using your favourite aircraft. If you happen to pick an aircraft that does not have a profile assigned to it, a dialog box will come up asking you which profile you want to use.
Appendix A - P3D v3
If you are using P3D v3.2 or greater, and you have multiple controllers, some of which have the same name, you may run into trouble if you try to use one of those controllers for your trim commands. FS Force and P3D may get confused and use the wrong controller. This is due to a limitation in the way P3D represents game controllers. Rather than using unique serial numbers which would allow it to differentiate between two controllers with the same name, it simply uses the name of the controller.
The solution to this problem is to refer to controllers by number, rather than by name. To do this you need to make manual entries into FSForce.cfg to program your trim commands, rather than using the Profile Manager. Open the file C:\ProgramData\FS Force\FSForce.cfg in a suitable text editor. (Note that the ProgramData folder is hidden by default, so you may have to configure Windows Explorer to show hidden files and folders.)
To specify which buttons you want to use for trim commands, you need to add two lines to the [General] section of the FSForce.cfg file. The general form is as follows :
[General]
JoystickTrimUp=Joystick:x:Button:y
JoystickTrimDown=Joystick:x:Button:y
Where x is the controller number, and y is the button number. Note that button numbers start with zero, so you would typically have to subtract 1 from the button number you wish to use.
The controller number is determined from within P3D, in the Settings / Controls screen:

First, change the "Sort By" field to Number, then open up the Controller Type drop-down list, and you will see the controller numbers that you need to use.
If you want to use the hat switch for trim commands, also called the Point of View (POV) switch, use the following format :
[General]
JoystickTrimUp=Joystick:x:POV:y:z
JoystickTrimDown=Joystick:x:POV:y:z
Where x is the joystick number (as above), y is the POV number (usually zero, unless your joystick has two hat switches), and z is the direction in degrees x 100. The valid values for z are 0 (ahead), 4500 (forward right), 9000 (right), 13500 (rear right), 18000 (rear), 22500 (rear left), 27000 (left), and 31500 (forward left).
The following example assumes you would like to use the forward and back buttons, located on the first hat switch of the second USB game controller:
[General]
JoystickTrimUp=Joystick:1:POV:0:18000
JoystickTrimDown=Joystick:1:POV:0:0
Some joysticks appear to have two hat switches, but the second hat switch is actually configured as additional buttons, in which case you would use the "button" format of the command as described above. Check the USB Game Controllers dialog to confirm this.
TRIM WHEEL
For trim wheels, use the following command entry:
[General]
TrimWheel=Joystick:<num>:<axis>
<num> refers to the joystick number, as in the earlier examples.
<axis> can be one of : Slider, XAxis, YAxis, ZAxis, RxAxis, RyAxis, or RzAxis . Again, look under Controls in P3D to see how P3D recognized it. If P3D recognizes your trim wheel as a "throttle", then it is considered a Slider, otherwise it is one the Axis values.
Example : TrimWheel=Joystick:1:Slider
LOGITECH G940
If you have the Logitech G940, use the following table to determine what <axis> entries to make for the various trim controls on the joystick/throttle:
| Joystick | Axis |
| Trim 1 | RzAxis |
| Trim 2 | RxAxis |
| Trim 3 | RyAxis |
| Throttle | |
| R1 | ZAxis |
| R2 | RxAxis |
Example : TrimWheel=Joystick:0:RzAxis [This sets Trim 1 on the joystick as the trim wheel]
Example : TrimWheel=Joystick:1:ZAxis [This sets R1 on the throttle as the trim wheel]
Appendix B - SimObjects Folder
FS Force uses the following algorithm to locate the SimObjects folder:
- It first looks in the registry to determine where the flight simulator is installed. For FSX / FSX-SE it looks under HKEY_CURRENT_USER\Software\Microsoft\Microsoft Games\Flight Simulator, and for P3D it looks under HKEY_CURRENT_USER\Software\Lockheed Martin\Prepar3D.
- The next step is broken down by flight simulator version:
- If you are running FSX or FSX-SE, it opens "C:\Users\[USER]\AppData\Roaming\Microsoft\FSX\FSX.CFG" and looks in the [Main] section for entries SimObjectPaths.0 and SimObjectPaths.1 to determine where Airplanes and Rotorcraft can be found, respectively. If either of those entries are not present, it uses SimObjects\Airplanes and SimObjects\Rotorcraft as defaults.
- If you are running P3D, it opens "C:\ProgramData\Lockheed Martin\Prepar3D v3\SimObjects.cfg" and looks for "Default Aircraft" and "Default Rotorcraft". If either of those entries are not present, it uses SimObjects\Airplanes and SimObjects\Rotorcraft as defaults.
- If the path obtained from #2 is relative (partial), it appends it onto the end of the install path from #1 and looks for aircraft there.
- If the path obtained from #2 is absolute, it ignores the install path and looks only in the path from #2.
Appendix C - Additional SimObjects
FS Force now has the ability to recognize the presence of additional add-on aircraft that are not in the default locations described above. This involves making special entries into FSForce.cfg. For instance, consider the following example:
[ExtraSimObjects.FSX-SE]
C:\Program Files
(x86)\Steam\steamapps\common\FSX\DLC\379243\SimObjects\Airplanes
C:\Program Files (x86)\Steam\steamapps\common\FSX\DLC\548760\SimObjects\Airplanes
[ExtraSimObjects.P3Dv4]
C:\P3DAddons\SimObjects\Airplanes
The first entry is for FSX-SE, and specifies the location of two DLC aircraft that were purchased through Steam. The second entry is for P3Dv4, and specifies a folder containing any number of additional add-on aircraft. You can also create an entry for P3Dv3 by adding a [ExtraSimObjects.P3Dv3] section. The folder you specify should be the parent of the individual aircraft folders. You can add as many folder references as you want in each section. You can have aircraft and rotorcraft vehicles in the same folder tree - it is not necessary to keep them separate as FSX/P3D does.
|